Integrating Openwave simulators with Microsoft Visual
Studio .NET
If you are developing mobile Web applications using ASP.NET
(using the ASP.NET mobile controls), you can test your content with Openwave
mobile browser simulators without leaving
Microsoft Visual Studio .NET . This is done by
configuring Visual Studio .NET to take advantage of the command-line arguments
supported by Openwave SDKs 4.1.1, 6.1, and 6.2. (These Openwave SDKs are
available for free from the Openwave
Developer Web site
.)
Openwave SDK 4.1.1 contains a simulator for Openwave mobile browser 4.1, which
adheres to the WAP 1.1 standard and renders content in WML. SDK 6.1 and
6.2 contain Openwave mobile browser 6.1 and 6.2 respectively, which adhere to
the WAP 2.0 standard and render content in XHTML Mobile Profile and CSS. You
can use any combination of simulators, depending on your needs and
the target devices for your market. For details on browser capabilities and
device deployments, see the Openwave
Developer Web site
.
For more information about integrating simulators with Visual Studio .NET, see
the MSDN Mobile Internet Toolkit article
"Working with Emulators and Browsers"
.
Requirements
Integrating an Openwave simulator with Visual Studio
You install an Openwave simulator as an application browser in Visual Studio
.NET.
- Start Visual Studio .NET.
- Open or create a mobile web project.
- From the File menu, select Browse With.
- In the Browse With dialog box, click Add.
- In the Add Program dialog box, enter the SDK simulator's
application path name in the Program name field, or click
Browse to browse to it.
If you installed the SDKs in their default locations, the path names are:
SDK 6.2: "C:\Program Files\Openwave\SDK 6.2\program\http\OSDK62http.exe"
SDK 6.1: "C:\Program Files\Openwave\SDK 6.1\program\http\OSDK61http.exe"
SDK 4.1.1: "C:\Program Files\Openwave\UPSDK411\upsim411.exe"
In the Add Program dialog box's Friendly name
field, enter any appropriate name, such as Openwave SDK 6.1.

For SDK 4.1.1 only:
Following the path name of the SDK 4.1.1 executable in the Add Program dialog
box, you must append -reload %URL.
Be sure to enclose the application's path name in double quotes ( "
), but append command-line arguments outside the quotes.

- Click OK.
For SDK 4.1.1 only:
When you click OK, you will get a message that informs you "File name
does not exist, is invalid, or contains parameters that cannot be validated.
Do you want to change your entry?" You may just click No in response
to this.
- In the Browse With dialog, click Set as Default to
make the Openwave simulator the default browser to test with.
- Click Close.
Testing with the Openwave simulator
To test your applications with the Openwave simulator in Visual Studio .NET,
select File > Build and Browse or File > Browse
.
The Openwave simulator starts with one or two windows depending on the
version. The main simulator window always gets initialized and
the Phone Information window may get initialized as well. Either window may
launch minimized or in the background, so you may have to bring it to the
foreground.
As you debug and make changes, you can again select File > Build and
Browse
to update the running simulator and pass it the URL you are currently working
on. This way you can test your current page or move between pages.
You can also navigate using the Openwave simulator itself, selecting links or
entering URLs in the simulator's "Go" field.
Debugging with the Openwave simulator
To debug your application using the Openwave simulator and the Visual Studio
.NET debugger, simply choose the Debug > Start or Debug > Start
Without Debugging commands. The Openwave simulator will be
launched and will display the running application, while the Visual Studio .NET
debugger will allow you to watch variables, step through code, and perform
other debugging tasks.
If you are using the Openwave SDK 4.1.1, however, you must first change your
project's debug configuration.
-
In the Solution Explorer, right-click on your project and choose the Properties
command.
-
In the Property Pages dialog for your project, select Debugging under
the Configuration Properties folder.
-
Set the Debug Mode property to Program.
-
Set the Start Application property to the full path of the Openwave SDK
4.1.1 executable. If you installed the SDK in the default location,
the path name is:
C:\Program Files\Openwave\UPSDK411\upsim411.exe
-
Set the Command Line Arguments property to
-reload, followed by the absolute URL of the start
page of your application.

-
Click OK to close the dialog. The project is now configured for
debugging with the Openwave 4.1.1 simulator.
Controlling a running simulator with Visual Studio .NET
You can create menu items in Visual Studio that send command-line arguments to
a running Openwave simulator.
The simulator features a number of command-line arguments, such as -clearcache
to clear the simulator's cache, -pho to change the simulator's
configuration file (or "skin"), and -lang for changing the
language, character set, and related localization settings the simulator sends
in ACCEPT headers to web servers. For a complete list and
description of simulator command-line arguments, see the Openwave SDK release
notes.
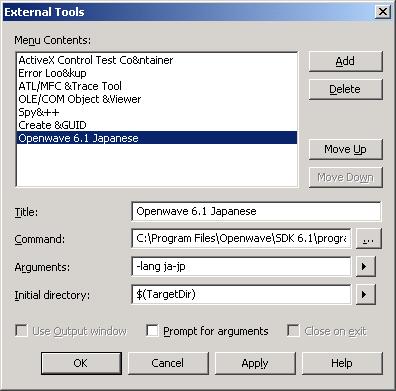
-
Select Tools > External Tools and in the External Tools
dialog box, click Add.
-
Replace
[New Tool 1] in the Title field with a
name for the new menu item.
-
In the Command field, enter the SDK simulator's application
path name, or click the ellipses button ( ... ) to browse to
it.
If you installed the SDK in the default location, the path name is (SDK 6.1 in
this example):
C:\Program Files\Openwave\SDK 6.1\program\http\OSDK61http.exe
Note: Unlike the Program name field in the Add Program
dialog box described earlier, you don't need to surround the path name in
quotes.
-
In the Arguments field, enter an Openwave simulator
command-line argument.
Because the simulator accepts only one argument at a time when it's running,
you need to create separate Visual Studio menu items for each command-line
argument you want to pass to the simulator.
-
Click the arrow to the right of the Initial directory field
and select Target Directory.
-
Click OK
The menu item is added to the Tools menu.
Notes
There are some Openwave simulator command-line arguments that you can only use
when you start the simulator, and there may be some that you want to set as
defaults (for example, the default language or default simulator configuration
file, or "skin"). In these cases, you can start the simulator using a batch
file with all the arguments you need. One way to to this is to edit the batch
file called when you start the simulator using its Start menu item, C:\Program
Files\Openwave\SDK 6.1\program\OSDK61http.cmd
. For details, see the Openwave SDK release notes.
If you are using SDK 4.1.1, the first time you launch the simulator using Build
and Browse, the -reload argument is not handled
correctly. The easy workaround is to just call Browse again,
or to launch the simulator using its own Start menu item or a batch file first.
All subsequent reloads work correctly.
TNVS-004
January 2003