Suppose you wanted to use Levels to adjust the shadows, midtones and highlights of an image, one can go directly to Image/Adjustments/Levels. However, the changes made to the pixel values effectively overwrite the original values, and the original values are lost (up to some degree of undoing). However, by going to Layers/Add New Adjustment Layer/Levels, the changes are applied to a new layer leaving the original values intact. Furthermore, with the new information on a layer, one can experiment with the Opacity and Fill levels as well as the layer's blend mode.
A histogram is a way of graphing a set of data. Along the x-axis one plots the values (or value ranges) that the the data points might have. Along the y-axis one plots the corresponding frequencies, the number of times (or sometimes the percentage of times) that a data point has that particular value (or falls within that range of values). In the Photoshop context, let us say you are in RGB mode, then each pixel has a number between 0 and 255 indicating the amount of red in that pixel. This set of data can be viewed as a hostogram by going to Window/Histogram and choosing the red channel. The tall columns correspond to shades of red that occur frequently in the image.
If one drags the highlight slider in the Level's dialog box, say from 255 to 200, then one performs a transformation that takes any value that was 200 or higher and maps it onto 255 and stretches (multiplies) lower values to fill in the range. Similarly, if one drags the shadow slider in the Level's dialog box, say from 0 to 40, then one performs a transformation that takes any value that was 40 or lower and maps it onto 0 and stretches (multiplies) higher values to fill in the range. Finally if one drags the middle midtone slider, then one performs a power-law transformation (where the power is called gamma). This transformation leaves the end points (shadows (0) and highlights (255)) intact but can shift the middle toward brighter of darker values depending on the value of gamma or alternatively the position of the slider.
An image is stored as pixels, that is by assigning values (corresponding for example to different colors) to each location within the image. Manipulating or editing the image then corresponding to changing these values. "Non-destructive" editing implies that the changes in the values are stored separately from the original values. This way the original image is not ruined and can be recovered at any stage.
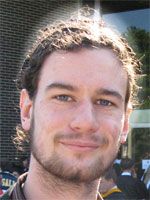
A. The two images below show Peter (and Sarah in the larger version) with and without a halo.


I made a duplicate layer with the image and in the higher one selected Peter and Sarah (two of my students this past year) and cut out the background. I added an intermediate medium-gray Soft-Light blended layer and then added a sequence of white ellipses (using the Ellipse Tool) and then Gaussian blurred them. I added one more Soft-Light blended layer on top, in this I painted over Sarah's glasses with black (to reduce the glare) and the whites of Peter's eyes with white. I reduced the opacity of this top layer.
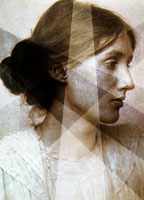
B. The image below shows a well-known image of Virginia Woolf with some triangular shaped burning and dodging. It is somewhat reminiscient of Charles Demuth's My Egypt.

C. Click on the thumbnail of Dan to see my attempt to take a little of the shine off of his face. (I did not touch his teeth; they really are that white.)

The Levels command is limited compared to the Curves command, but it is also simple and straighforward to use whereas Curves can be difficult and unpredictable. For a given channel, say red, the Levels method provides control over three basic "regions in color space": shadows, midtones, and highlights. One drawback is that the shadow and highlight sliders can collapse a set of shades into one shade, and if these shades are near each other in the image, then a flat region may result. Curves can be used to give the user much finer control, strictly speaking up to 256 points of control. Another difference is that the transformations in Levels are monotonic, that is the order of the shades is preserved. If of two shades, A and B, A is darker, then the transformed A will also be darker (or the same) as B. With Curves this restriction is lifted. A non-monotonic transformation was used in the "chrome" effect.
The brightest and darkest pixels of the original image may lack detail and not be representative of the picture as a whole. Alternatively, one does not what to lose what details there are in the brightest and darkest pixels, so it is best to base one's corrections on an intermediate value.
A neutral gray has equal amounts of red, green, and blue in the RGB color scheme. So numerically it is easy to spot when a color is not a neutral gray. Also because a neutral gray has no hue, a small change in the hue, from zero to non-zero, is more noticeable to the eye as well.
The Threshold command will collapse the image into two extremes. If a pixel's luminosity value is below the threshold value, it is shown as black; and if the pixel's luminosity value is equal or higher than the threshold, it is shown as white. By sliding the threshold value slider, one can identify the region with very low luminosities (those that appear black when the slider is far to the left) and very high luminosities (those that appear white when the slider is far to the right).