Lab 3: 2-D kinematics
Projectile motion
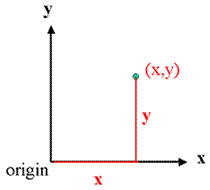
In this lab, we will study projectile motion, which is a special case of two-dimensional motion. In two-dimensional space, an object's position is given by a pair of numbers (coordinates). One way to represent the position is to use Cartesian coordinate, i.e. two orthogonal (at right angles) axes, usually called x and y. Imagine starting at the origin; you can reach a destination position by first moving along the x axis and then along the y axis. The destination point is identified as (x,y), where x is the distance moved along the x axis and y is the distance moved along the y axis. Of course, objects rarely move in this peculiar fashion; it's just a way of thinking about how a position is represented in Cartesian coordinates. The two parts, x and y, are referred to as "components."
Projectile motion results when an object is subject to a single force: the constant force of gravity. In this case it is convenient to choose a Cartesian coordinate system with the y axis in the vertical direction (along a line pointing outward from the center of the earth) and the x (horizontal) axis perpendicular to the y axis. If one position is represented by a pair of numbers, then the entire motion is represented by a pair of functions:
- x(t): the horizontal component of position as a function of time
- y(t): the vertical component of position as a function of time
The orientation of the coordinate system was selected so that the acceleration of the object is solely in one direction, the y direction. Consequently, there is no acceleration in the x or horizontal motion, and the x-motion is described by the constant velocity equation
x(t) = x0+ v0x t
where x0 is the horizontal component of the initial position and v0x is the horizontal component of the initial velocity.
There is a constant acceleration in the vertical direction, and so the vertical motion is described by the constant acceleration equation
y(t) = y0 + v0y t - (1/2) g t2
where y0 is the vertical component of the initial position, v0y is the vertical component of the initial velocity and g =9.8 m/s2, the constant acceleration due to gravity. The minus sign in the equation above is a consequence of selecting the positive y-axis in the upward direction.
Part I - Vertical Launch
We'll begin our measurements with a one-dimensional, purely vertical
motion, i..e. a free-fall situation.
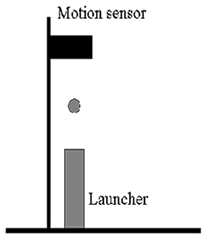
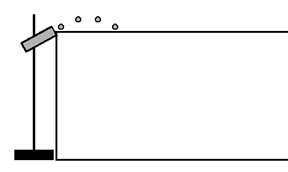
- Aim the launcher (shown below, left) vertically toward a motion sensor that is mounted on a ring stand (shown below, right)
 |
 |
- Load the ball into the launcher. There are different settings, i.e. different amounts that the internal spring can be compressed. You must make sure you always choose the same setting (same number of click sounds).
- Set up the interface/motion sensor
- Click REC and then shoot the launcher
- Click STOP after the ball has landed. It should be caught by the launcher.
- Copy and paste the position versus time data into Excel. The positions are measured relative to the sensor with down as positive direction. To use the y-equation above, the measurements need to be relative to the launcher with up as the positive direction. Your position data should have a "flat" portion and a "parabolic" portion. To make the necessary reference and orientation adjustments, insert a column between the time and position column. In the inserted column subtract each position measurement from the flat position measurement. (Explain why this subtraction method places the origin at the launcher).
- Use your data to determine experimental values for the total Air Time and the Maximum Height (above the launch position)
- Extract the parabolic part of your y vs. t data and fit it to a second-order polynomial (use only the time and your inserted columns, not the original position column).
- Take a derivative of that polynomial to find the velocity as a function of time.
- Use your equation for v(t) to determine the velocity v0y at the beginning of the parabolic part of the motion graph. (Hint: substitute in the appropriate t, it is not t=0.)
- Fill in the following table, using 1-D kinematics of free-fall to theoretically calculate the Air Time and Maximum Height assuming that g = 9.8 m/s2 . Compare these values to the experimentally determined values.
| V0y | Air Time | Max. Height | Air Time (theory) | Max. Height (theory) |
|---|---|---|---|---|
- Use your v(t) equation to calculate an experimental value for g. Using this value, re-calculate the theoretical Air Time and Max Height. Compare these values to the experimentally determined values.
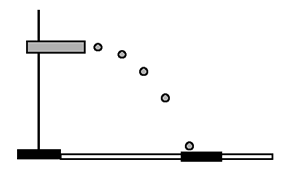
Part II - Horizontally Launced Projectile
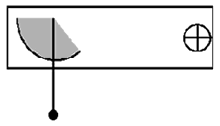
- Remove the nut from the top of the bracket (shown below).

- Attach the bracket to the nut that is embedded in the launcher. Notice the plumb line (little string with a weight on the end) and the protractor, they will allow us to determine the angle between the launcher and the horizontal.
- Fix the launcher to a ring stand so that it is level (zero degrees from the horizontal), as shown below.
- Take some paper from the roll and lay it out in front of the ring stand. You may need two or three rows in order to increase the effective width of the paper.
- At the end of the launcher, there is a circle indicating the "launch position" (the initial position) of the projectile. Mark a position on the paper directly under the center of this circle. (You could use a plumb line, though not the one that comes attached.)
- Measure h the distance from the bottom of the launch position to the floor.
- Load the ball into the launcher. (Remember to use the same setting -- click sounds -- as in Part I).
- Shoot the ball so that it lands on the paper. Note roughly where it lands and place a piece of carbon paper there. Make sure the ringstand hasn't moved (there's a slight recoil from shooting and/or you might have bumped the ringstand.) Shoot the ball again. Now if you lift the carbon paper, there should be a mark on the paper underneath where the ball landed.
- Measure x, the distance between the point on the paper directly below the launch position and the point where the ball landed on the paper.
- Repeat the above measurement four more times.
- Change the height and repeat the measurements. Do this for a total of five different heights.(i.e. a total of twenty-five measurements.) There should be at least 50 cm difference between your highest and lowest height.
- Use Excel functions to calculate the average and standard deviation of the range.
- For a given height h, use g=9.8 m/s2 for the acceleration due to gravity to calculate the time the ball took in going from the launch position to the floor. (Assuming there is no air resistance, the above y equation becomes)
0 = h - g t2 / 2
- Using this time and the average x, calculate the average initial velocity.
xav = vav t
- Fill in the following table
| Height (h) | Range(x) Trial 1 | Range(x) Trial 2 | Range(x) Trial 3 | Range(x) Trial 4 | Range(x) Trial 5 | Average Range | Stand. Dev. | Average Velocity |
|---|---|---|---|---|---|---|---|---|
Analysis
- Because of the random fluctuations in your range measurements, there
will be corresponding imprecision in any velocities calculated using this
data - a phenomenon known as propagation of errors. To get a
quantitative measure of this, one can calculate the spread in velocities
that arise from the range fluctuations. For a given h,
let us take the spread in x (represented by Δ x
below) to be given by the standard deviation of the x's. The spread
in the corresponding velocity for a specific h is then
calculated by
v = ( xav ± Δx ) / t = vav ± Δx / t,
where Δv = Δx / t is the spread in velocity. Using this method, calculate the spread for the heights used in your experiment. (Average velocity is from Table 2.)
| Height | Average Velocity | Spread in velocity |
|---|---|---|
- The speed of the balls out of the launcher should not depend on the heights of the launcher. Is this what you find? To answer this, calculate the average initial velocities from Part 2 and compare to the v0y found from Part I.
| Velocity Part I | Average Velocity Part 2 | % difference |
|---|---|---|
- Plot h vs. Xav and fit to a power law. Compare the power you find to the theoretical prediction.
h = [g /(2v2)] x2;
Part III - Range Variation with Launch Angle
- Set up the launcher at a 20° angle with the horizontal and such that the bottom of the launch position (circle drawn on end of launcher) is at table-top height, as shown below
- Lay out the paper and carbon paper similar to Part II
- Shoot the ball and measure the range R, the distance from the launch position to landing position. Repeat twice more.
- Repeat the above range measurements for 25° ... 70°. Make sure that as you change the angle that the bottom of the launch position (circle drawn on end of launcher) remains at table-top height
Analysis
Make a table of your experimental and theoretical ranges.
| Angle | Range Trial 1 | Range Trial 2 | Range Trial 3 | Average Range | Theoretical Range |
|---|---|---|---|---|---|
| 20° | |||||
| 25° | |||||
| 30° | |||||
| 35° | |||||
| 40° | |||||
| 45° | |||||
| 50° | |||||
| 55° | |||||
| 60° | |||||
| 65° | |||||
| 70° |
The theoretical range Rth is given by
Rth = v02 sin ( 2 θ) / g
(Use the average initial velocity found in Part I for v0.)
For what angle is the theoretical range a maximum? Do your measurements agree with this prediction?