 PYL 106: Kirchhoff and RC Circuits

This lab has two parts. The first part is on Kirchhoff's laws. The second
part is on RC circuits.
Charging and discharging a
capacitor: RC circuits
When you connect an uncharged capacitor and a resistor in series to a
battery, the voltage drop is initially all across the resistor. The voltage drop
across a capacitor is proportional to its charge, and it is uncharged at the
beginning. But charge starts to build up on the capacitor, so some voltage is
dropped across the capacitor now. With less voltage being dropped across the
resistor, the current drops off. With less current, the rate at which charge
goes onto the capacitor decreases. The charge continues to build up, but the
rate of the build up continues to decrease. In mathematical language, the charge
as a function of time Q(t) increases but its slope decreases.
Theory says the charge obeys
Q(t) = C VS (1 - e-t/t)
where t is the time, C is the capacitance, VS is the saturation
voltage which in this case is equal to the voltage across the battery, and t=RC, a time constant. The corresponding voltage across the
capacitor is
V(t) = VS (1 - e-t/t)
Now consider the case of a charged capacitor, a resistor and no battery. With
no battery to "push" the charges around, the opposite charges on the capacitor
plates would prefer to be together. They must pass through the resistor before
they can reunite. With all those like charges on one plate, there is a strong
incentive for charges to leave the plate. However, as charges leave the plate,
this incentive decreases, thus the rate at which charges leave decreases as
well. In mathematical language, this time the charge as a function of time Q(t)
decreases and its slope decreases.
Theory says the charge obeys
Q(t) = Q0 e-t/t
where t is the time, Q0 is whatever charge we happen to start
with, and t=RC is the same time constant as above. The
corresponding voltage across the capacitor is
V(t) = V0 e-t/t
where V0 is the initial voltage.
EXPERIMENT 1
- Set up the Simpson multimeter as an ohmmeter.
- If there are three holes on the left-hand side of your multimeter, make
sure the red lead is plugged into the hole marked V-W and that the DC (direct current) and
kW button are depressed.
- Press the 20 on the lower front.
- Insert one needle in each hole adjacent to the resistor, allow some time
for the reading to settle down, and record the resistance below.
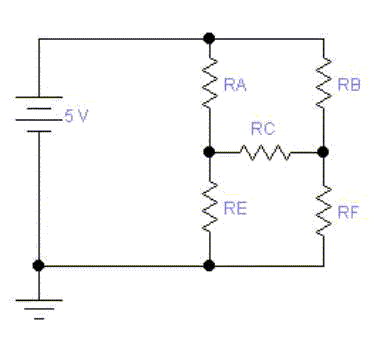
Measure the resistances RA, RB,
RC, RE, RF and record them in the table
below. (Resistances are measured when the resistor is not connected to a
circuit.)
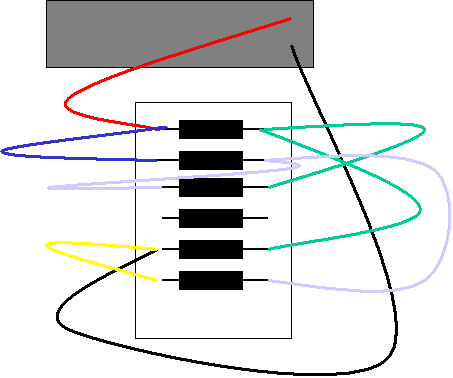
- Next, connect the resitors in a circuit like that shown below
 Your version may look more like this
 Look in the above circuit for resistors that are in series (resistors
are in series if the current passing through the first is the same, no more no
less, as that passing through the second). There are none! Look in the above
circuit for resistors that are in parallel (resistors are in parallel if the
"tops" and "bottoms" of the resistors are connected by wire and only wire).
There are none. The analysis of such circuits requires Kirchhoff's rules.
Look in the above circuit for resistors that are in series (resistors
are in series if the current passing through the first is the same, no more no
less, as that passing through the second). There are none! Look in the above
circuit for resistors that are in parallel (resistors are in parallel if the
"tops" and "bottoms" of the resistors are connected by wire and only wire).
There are none. The analysis of such circuits requires Kirchhoff's rules.
- Set up the power amplifier as a DC power supply, connect it to Science
Workshop, etc.
- Set up the Simpson multimeter as a voltmeter and measure the voltage
across the resistors and enter them in the table below.
| |
Resistance
( ) |
Voltage
( ) |
Current
From Experiment
( ) |
Current
From Theory
( ) |
Percent
Error |
| RA |
|
|
|
|
|
| RB |
|
|
|
|
|
| RC |
|
|
|
|
|
| RE |
|
|
|
|
|
| RF |
|
|
|
|
|
- Obtain the experimental current from your resistances and voltages using
Ohm's law I=V/R and enter them into the table above.
- Solve Kirchhoff's laws for the currents in your circuit and enter them
into the table above. Include the solution in your report. (Collect the data
for the second part of the experiment before performing this analysis.)
EXPERIMENT 2
Part I
Charging:
- Connect your interface to a power amplifier and set it up as a DC voltage
source.
- Connect a voltage sensor (shown below) to analog channel B.
- Then in Science Workshop drag the analog plug icon into the analog channel
B icon and choose "voltage sensor." Drag a graph into analog channel B so we
can see the data as it comes in.
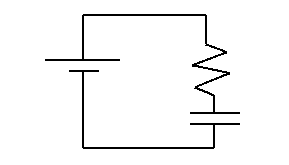
- Set the voltage to 5.00 V but make sure the signal generator is off.
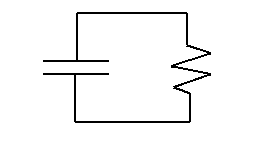
- Make a circuit with resistor RA and a capacitor in series. Your
capacitor should be discharged. Diagrammatically this circuit is represented
by
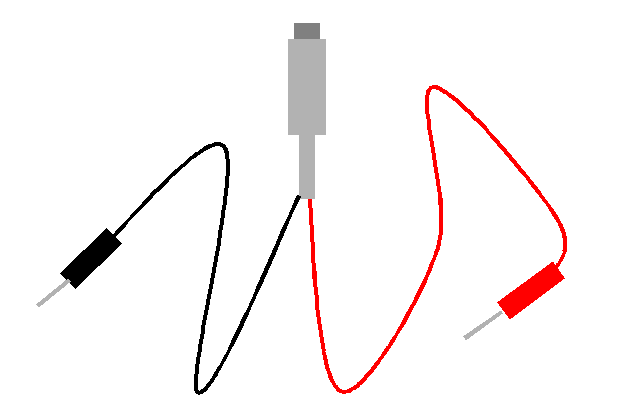
- Put the leads of the voltage sensor across the capacitor. Your circuit
will look something like the following
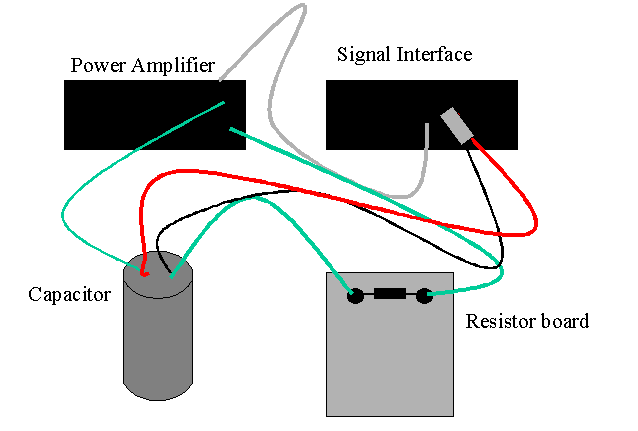
The green wire represents the RC circuit (resistor and capacitor in
series), while the black and red wires represent the voltage probe.
- Start recording data and THEN switch on the signal generator.
- You should see the voltage increase and "saturate" at 5.00 V. When it is
very close to 5.00 V, stop recording, disconnect the capacitor and then turn
off the signal generator. You must disconnect first so that the capacitor
will have a charge left on it!
- Table the data, click the clock, copy and paste the data over into Excel.
It will look something like:
| 0.0 |
0.049 |
| 0.1 |
0.049 |
| 0.2 |
0.058 |
| 0.3 |
0.053 |
| 0.4 |
0.049 |
| 0.5 |
0.053 |
| 0.6 |
0.053 |
| 0.7 |
0.053 |
| 0.8 |
0.053 |
| 0.9 |
0.053 |
| 1.0 |
0.088 |
| 2.2 |
0.112 |
| 2.3 |
0.141 |
| 2.4 |
0.171 |
| 2.5 |
0.2 |
- The charging capacitor data should be described by the equation
V(t) = VS( 1 - exp( - t / t ) ),
where VS is the saturation voltage, t
is a characteristic time, and where it is assumed that t=0 is when we switched
on the voltage supply.
- Recall we started recording before switching on the signal generator. We
must adjust the time. In the example above, the action really begins at t=0.9.
- Insert a column between the two above. If the first number is in cell A1,
put in cell B1 the formula =A1-0.9 and copy down.
- Delete the data in rows corresponding to the times before the signal
generator was switched on.
- Plot Voltage vs Time
- At this stage follow these instructions
for fitting the data.
Charging RA
Discharging:
- With the voltage sensor across the now charged capacitor, begin recording
a new set of data.
- Connect the capacitor to resistor RA (no power supply).
- The voltage should start close to 5.00 V and decay to zero.
Diagrammatically the circuit looks like the following
- Copy and paste the data (times and voltages) into Excel.
- Make the same adjustments to the time that you did above to the
discharging capacitor data and plot it. For this case you can use the
exponential option in Add Trendline. Compare the t's.
Discharging RA
Part II
- Repeat the charging part of the above measurements with resistor
RB.
- Then repeat the discharging part of the above measurements with the
combination of RA and RB in series.
- Do the plotting as above and compare t's.
- Does the result agree with theory?
Charging RB
Discharging RA and RB
| V0 ( ) |
|
| t ( ) |
|
| Theory t ( ) |
|
| Percent Error |
|
Part III
- Get the measurements of the resistances RA and RB
from the Kirchhoff part of the lab.
- Use your results to extract the capacitance. Note this is the first time
we have a capacitance as opposed to a ratio of capacitances.
Include in your report:
- What is your best estimate of the time constant if the resistors in the
part-II discharging had been in parallel?
- What would happen to the time constant (increase or decrease) if we
replaced the single capacitor with the combination of it and a second
capacitor in series? Why?
- What would happen to the time constant (increase or decrease) if we
replaced the single capacitor with the combination of it and a second
capacitor in parallel? Why?