PYL 106

line


Thin Lenses

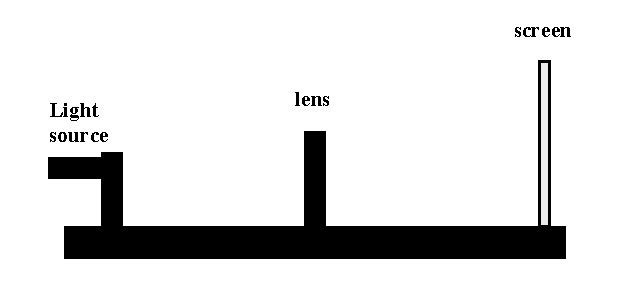
One use of refraction, the bending of light rays, is lenses. There are two surfaces (air-to-medium and medium-to-air). If the surfaces are approximately spherical and close together, one has what is called a "thin lens". The results of the bending can be simplified into an equation called the thin lens equation

1/p + 1/q = 1/f.

In your report, you should tell me the meaning of each of the quantities appearing in this equation. The variables are distances from the lens to certain points. So in addition to identifying these distances, you should answer the questions: What is "the image"? What is the "focal point"?

Part I.

  1. Place a light source and screen on opposite ends of an Optics bench. In between place one of the thin lens marked +250 mm.

    lens setup


  2. Adjust the position of the lens until the image on the screen comes into focus.
  3. Note the distance from the source to lens (call it p) and the distance from the screen to the lens (call it q).
  4. The light source has arrows drawn on it, one should be pointing up. Note whether the corresponding arrow in the image is pointing up or down.
  5. Measure the length of the source arrow, call it y0.
  6. Measure the length of the image arrow, call it yi.
  7. Test the relationship

    m = yi / yo = | q / p | ,


  8. Next, without moving source or screen, find another position of the lens for which the image comes into focus. Measure p, q, yo and yi.
  9. Decrease the distance between screen and source (by a few centimeters) and repeat the above procedure. Find two sets of (p, q, yo, yi).
  10. Change the distance twice more finding two sets (p, q, yo, yi) for each distance. (Note if the screen and source are too close you cannot find a position where the image comes into focus.  In such a case you will have to increase distance between source and screen.)
  11. Your p and q should obey the thin lens equation, see above. The quantity f is the focal length. Solve for f for your various sets of data.
  12. What distance between source and screen is too close for one to bring the image into focus? How is it related to f?
+250-mm lens
p  
( )
    
q   
(  )   
 
yo  
(  )  
  
yi   
(  )  
   
q / p   
 
yi/ yo    
 
f    
(  )


Part II

Repeat the measurements above for the lens marked +100mm.

+100-mm lens
p  
( )
   
q   
(  )
    
yo  
(  )
    
yi   
(  )
     
q / p  
          
yi/ yo 
          
f    
(  )


Part III

  1. Remove the light source from the Optics bench.
  2. Cover your screen with graph paper. Place some small arrows in the squares in the middle approximately the same height as the lens. (The purpose of the arrows is for the experimenter to determine whether the image is upright or inverted.) Place the screen at one end of the Optics bench.
  3. Place the +100 mm lens at a distance which is two to three centimeters less than your focal length (found above) from the screen.
  4. View it from the other end of the bench. You should observe a magnifying glass effect.
  5. Estimate the magnification by counting how many segments span the diameter when looking through the lens compared to how many span the diameter when looking over the lens at the same distance or when you look through one of the empty "holders". (You are not to count the squares that fill an area, but count the number of units along a diameter.  In the picture below there are about 1.4 units when looking through the lens and 4.5 when looking over the lens.)

    magnifying glass effect

  6. Compare your result to q / p (p is now the distance from screen to the lens and q is calculated from the thin lens equation).
  7. Is the image inverted or not?
  8. Next, place the lens at a distance which is two or three centimeters more than your focal length from the screen and repeat.
  9. For one of the above scenarios draw a ray diagram http://hyperphysics.phy-astr.gsu.edu/hbase/geoopt/raydiag.html. Try to make the lengths in your ray diagram proportional to the distances in your calculation (assuming your calculation is correct). Also label the rays and indicate the rules you used to draw them. For example, one ray goes straight through the center of the lenses.


One lens magnification
p  
( )  
 
f
(  )
    
q  
( )
  
q / p     # of segments
through lens
# of segments
over lens
Estimated
Magnification
Image
inverted


Part IV.

Note that the image above is very rounded (distorted). One can improve this situation by addding a second lens.

  1. Add the 250 mm lens to your set-up between the 100 mm lens and your eye. Adjust until the image is clear, the lines relatively straight, and you see some magnification.
  2. Measure the distance between the 100 mm and the screen (call it p1) and the distance bewteen the lenses (D).
  3. Estimate the magnification as above.
  4. With a combination of lenses, the image from the first lens serves as the source for the second lens. Calculate q1, the image for the first lens. The object for the second lens, p2, is then D-q1. Use p2 to calculate q2.
  5. The magnification of the combination should be the product of the individual maginifications: (q1/ p1)(q2/ p2). Compare this to your estimate.
  6. Change the positions of lenses and repeat the measurements.

Two-lens magnification
p1  
(  )  
 
f1
(  )
    
q1    
(  )
  
D    
(  ) 
p2 
(  )
f2
(  )
 
q2 
(  )


Two-lens magnification (cont.)
q1/ p1    q2/ p2     (q1/ p1)(q2/ p2)    # of segments
through lens
# of segments
over lens
Estimated
Magnification
Image
inverted


line