IWA-HWG Photoshop Course. Weeks 1 & 2 Lab
Part 1. Color-Correct an Image Using Curves
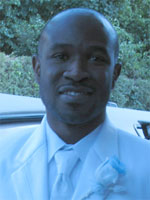
Patricio should not be blue on his
wedding day. I took a photo of my student Patricio
outside the church without adjusting my camera for outside,
so the photo came out with a blue cast. Below I list some of
the details of the color correction scheme using Photoshop's
Curves control that I applied.
- Using the threshold command I identified a region of
shadow (a sample from the limo's tire had RGB of (21, 21, 21))
and a region of highlight (a sample from the top of the
open door of the limo had RGB of (208, 240, 255).
- Since the tuxedo was white I sampled two of the shadowed
regions (one under the lapel) to use for neutral gray midtones. I found
(71, 124, 184) and (84, 157, 225).
- I added a Curves Adjustment Layer. On the red channel I
put on Input/Output points of (21, 21), (71, 126), (84,155), and
(208, 234). On the green channel I put on Input/Output points
of (21, 21), (124, 126), (157,155), and (240, 234). On the blue
channel I put on Input/Output points of (21, 21), (184, 126),
(225,155), and (255, 234).
- I added three medium-gray Soft-Light (three different layers
so that I could change their opacity independently, though I guess
I could have changed the opacity of the brush strokes). In the first,
I slightly whitened Patricio's teeth; in the second I whitened the
whites of his eyes (only noticeable up close); and in the third
I darkened under his chin on what would be his left side. The last
brush stroke was also Gaussian blurred.
Right click on the thumbnail below to save the Photoshop file

Click
here for a side-by-side
comparison of two jpeg images.
Part 2. Restore an Image using Blend Modes, add a Sepia or
Selenium tone (or any other color wash such as a cyanotype etc.)
and retouch any tears and/or scratches
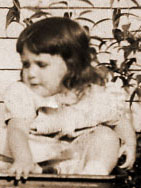
I worked on a scan of an old photograph of my mother in her
sister's wagon. (Click here to see
the tif file of the original scan.)
-
I cleaned up the image using mainly the Healing Brush Tool
and the Eraser tool (with a low opacity and flow).
-
I duplicated the layer and changed its blend mode to multiply
to darken the image.
-
I added a neutral-gray Soft Light layer and brushed in the
M in "Mary" on the wagon
and a few other touches.
-
I added a Curves adjustment layer to make the shadows a little
darker and the highlights a little brighter.
-
I added a Hue/Saturation adjustment layer with a Hue of 30
and a Saturation of 25 to "colorize" the the image with a
sepia tone.
Right click on the thumbnail below to save the Photoshop file

Click
here for a side-by-side
comparison of two jpeg images.
Part 3. Extra
My extra work can be found under Question 5 of
my answers to the review questions.
